Search This Blog

Showing posts with label craft projects. Show all posts

Saturday, May 19, 2012

Easter Eggs

I tried something new (as seen on Pinterest) when I colored my share of Easter Eggs this year.  I think it turned out REALLY cool!

IMG_7658

I put stickers on each egg, and then stuck it in the dye.  When they were dry, I pulled the stickers off.  SO easy, and they look really cool!

IMG_7648

Try it yourself next year!  You can do all KINDS of different things this way!  Polka dots, or random shapes…whatever you have for stickers!

Monday, January 26, 2009

Pursuing Picaso

Oh...I found a new hobby! There's a store in Cedar Falls called "Pursuing Picaso". At least I think that's the name, LOL. You go in and you pay $6 to use their supplies, and then you pick out any plain white ceramic item that you wish to paint. They all have varying prices, and they include all KINDS of kitchenware like coffee cups and mugs, teacups and saucers, soup mugs, soup bowls, huge platters, cake plates, dinner plates, etc. They also have vases, and just all KINDS of things to choose from. Then, you use their glazes and paint any design you wish onto your item. When you are done, they will fire it for you, and you can pick it up a week later.

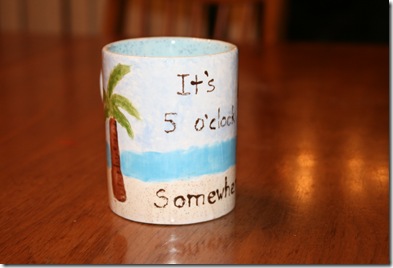
A group of ladies went there a couple of Sunday's ago, and we had so much fun! I got my mug last night. Here's what it looks like!

IMG_8122

the glaze on the bottom is light brown flecked like sand!

IMG_8123

can you tell it's been a LONG winter in Iowa???

IMG_8124

I sponge painted the cloudy sky.

I can't WAIT to go back and try something else!

Sandy

Saturday, March 29, 2008

Booty Bag

hee, hee...no one is going to believe me when I say that I AM NOT A SEWER! Here I have two blog posts within a week or so, involving ME and a SEWING machine!

But this one is SOOOOO easy! And CUTE! I followed the directions from a website (www.craftbits.com) You simply take a pair of jeans, (size 0-5 in juniors makes a really cute sized bag) and cut the legs off in a straight line. Turn inside out and sew straight across to make the bottom of the bag. Then, take 2 side seams from the legs you cut off...cut 1/2 inch on each side of the seam, and unravel it/fray it. (THIS is what took the longest time of the whole project!) Then...sew them on for handles. How easy is that? (Of course, I can say this because my mother in law was still here giving her assistance!)

It really only took about 10-15 minutes (except for the fraying!)


Posted by Picasa

Thursday, March 27, 2008

Making Placemats

I am not a sewer, but when my Chit Chat friend Marion gave me the instructions for these, I thought "Now THAT I can do!" Of course, I waited until my mother-in-law was here to guide and help me...otherwise I still probably wouldn't have begun!

We purchased the material at Wal-mart on Monday.

We cut the quilt batting into 18 x 12.25 rectangles (figuring the sizes and numbers was the MOST difficult part of making these palcemats!)
We cut the purple and yellow backing materials to the same size.
Then, we cut strips that were 18 x 2.25 out of all of the other material. We planned for 7 strips for each placemat.
All of the materials cut and ready to be sewed!Next we sewed the strips to the batting and the backing. We sewed up 6 of them, (well...My mother-in-law pinned and I sewed...it worked GREAT with the two of us (just don't ask how much we ripped out!) and then we trimmed them to size. The finished size is approximately 11 x 17.
We cut 2.5 inch wide strips and then folded and pressed them, and then we sewed them on for the binding.
Posted by Picasa